Installing a Star TSP100
Step 1: Download the Driver
1. Visit the Star Micronics website before powering on your Star TSP100 receipt printer go to the Star Micronics site,.
2. Select "Thermal" for Product Type, "TSP100" for Printer Family, "STAR TSP100ECO" for Printer Model, and your Windows version for Operating System.
Step 2: Install the Driver
1. Extract the downloaded file and run the installer for your 32 or 64-bit OS.
2. Click "Next" through all the installation prompts.
Step 3: Connect the Printer
1. Plug in your printer and turn it on once the installation is complete.
Step 4: Configure Printing Preferences
1. Right-click the Desktop and navigate to "Personalize" > "Control Panel Home" > "View Devices and Printers."
2. Right-click the Star printer and select "Printing Preferences."
1. Right-click the Star printer and select "Printer Properties."
2. Click "Preferences," set the paper size to "72 x Receipt," and click "OK" to return to the printer properties window.
3. Click "Advanced" > "Printing Defaults," set the paper size to "72 x Receipt," and click "OK" to return to the printer properties window.
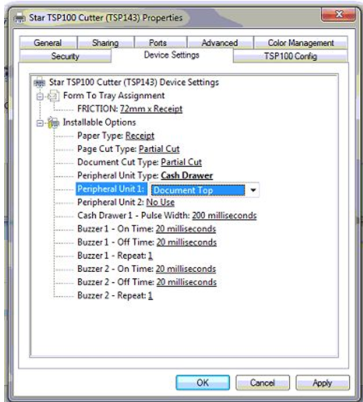
Step 6: Configure Device Settings
1. Click "Device Settings" and set:
- "FRICTION" to "72 x Receipt"
- "Page Cut Type" and "Document Cut Type" to "Partial Cut"
- "Cash Drawer One" to "Open Before Printing" (if you have a printer-driven cash drawer)
Note: Newer driver versions may have more installable options on the Device Settings tab. Choose these options if available.
Note: If you encounter installation issues, contact your facility IT or Network Administrator to ensure that admin permissions are not causing any issues.
Related Articles
Star Micronics : Error Lights
Article Contents: This article reviews the various error lights displayed by Star Micronics Printers. Step 1: Star Micronics Error Lights Power light Error light Beep code Issue description Recommended fix On On Continuous The top cover of the paper ...Star Micronics : Help Center
Article Contents: This article provides an in browser and link option for viewing Star Micronics help center. To view the Star Micronics Help Center website, please click here.Epson : Downloading and installing the Epson driver for Windows
Downloading and installing the Epson driver for Windows. Step 1: Download the latest printer drivers. This is specialized software that helps the printer run correctly on your computer. To download this, go to Epson's website and select Windows ...Star Micronics : Long Receipts Cutting off in Windows
Article Contents: This article will guide users through the process of configuring printer settings to prevent long receipts from being cut off. Step-By-Step: Step 1: Open the Devices and Printers panel on the computer. The steps to access the ...Installing Jonas Synergy on Windows 11 Home in S Mode
Article Contents: This article covers the steps on how to install Jonas Synergy on a Windows 11 laptop running in S mode, which initially only allows installations from the Microsoft Store. Step-By-Step: Step 1: Determine if your Windows 11 is ...